Wednesday 26 February 2014

La Prairie skin caviar foundation

I often pay attention to people ranting about their foundation choice or considering a different one. Certain brands have won me over more than others. It clearly isn't simple determining which one is right for you. This weekend I had gone on a hunt to find a foundation that is exceptional containing ingredients that offer skin rejuvenation, good coverage,luxury as well as SPF protection.

The Caviar Collection by La Prairie contains potent moisturizers, sea proteins and invigorating elements of Caviar Extract. This creation instantly offers remarkable extravagance to your skin.  I was hypnotized by this product just seeing its superficial effects. The Foundation gave me more coverage than I expected; it is light, long lasting and feels breathable. After applying this foundation I found that my skin appeared photo shopped, significantly more radiant and even.


This range focuses on loss of firmness and elasticity and the results are immediate, giving your skin a firmer appearance in minutes. It is a 2 in 1 with a concealer complimenting the foundation tone. I know this product is insanely costly but it is just beautiful!

Sunday 23 February 2014

Blush with Dior

Dior has introduced a pore minimizer which promises to create a matte finish. Skin Primers are specially formulated for softening the appearance of lines, diminishing pores and providing an even, flawless skin to work with. Once this is achieved foundation appears more refined and mellifluous. The surface that every artist works towards creating is one that literally feels like silk to the touch in order for the rest of the make up to balance effortlessly.

I began testing this product as I would any other primer which left me unsettled. My models skin was tighter, which I am certain is the aim to minimizing pores, however, her foundation appeared dry and inconsistent. I manipulated the foundation onto her skin to get an even texture which is really taboo in application.


I was certain though that this invention had other capabilities. It had not functioned well underneath a foundation, so I tested it over my base and what marvelous results I had found.  I dabbed 3 little dots on my cheek bones as well as my jawline and gently massaged it with small circular motions where I would normally highlight or contour.
Before
After


It polished my skin texture, created an illusion of a radiant light falling on the area which I applied it on and brightened my features.

Couple this with Dior’s Rosy Glow Blush which picks up to your natural pigment in your skin and adjusts to that, creating a fresh and natural glow. Apply this to the apples of the cheeks to bring out your cheekbones.


Model wearing Dior's rosy glow blush on apples of her cheeks keeping tones very natural and fresh

If you want to add a little extra glamour, add Dior’s glow to the outer part of your cheek which is absolutely fabulous.

Thursday 20 February 2014

Le Rouge Lipstick

Le Rouge is the latest collection in the GIVENCHY make up range showcasing itself as a style star must have. Their exhibition is dazzling with mirrors used in almost every component in their displays. With all that glitters there must be gold I thought and allowed the stylishness to draw me towards their impressive counters.

I was instantly welcomed with a warm smile by the artist at the GIVENCHY stand who assisted me in testing the new lipstick range. While sampling this product I was told that it was long lasting, lightweight and soft to the touch.


The Pigments are solid which I as an artist can appreciate, the texture is smooth and moisturizing while still providing precision and just one stroke is necessary in application to achieve the finest shade. The advantage of this lipstick is the semi-mat finish simultaneously upholding a light velvety feel.


I was infatuated with the colour Fuchsia irresistible 205, which lasted several hours on my lips, gave me a mild plumping effect and did not bleed. The lipsticks are attractively packaged in a genuine lambskin case making it even more desirable. 

Monday 17 February 2014

Sun protection for your hair


Being originally from Gauteng most of my childhood beach memories are from visiting the sea waters in Durban which easily reach temperatures of 26 degrees. The golden sands feels like soft stones on your feet, the waves are rough and the water is welcoming. I would often visit there winter time in my mid-year holiday when everywhere In South Africa was bitterly cold besides for Durban. I could spend my entire day just splashing in the sea.

.
Moving to a new city with a beach was thrilling to me as I had always enjoyed the water. Cape Town’s coastlines are striking with its white soft silky sand and its clear picturesque waters.  A walk on the seaside can take you a million miles away from any stress. I find myself lost in space and allowing thoughts to flow with ease just watching the waters current. It is a place of serenity and pleasure. Expected temperature levels of the Capes waters are around 15 degrees. A dip in the ocean and my toes go numb, I had never imagined that the water could be that icy. I am in awe of those brave enough to bathe in those waters
A typical beach day to me is packing my picnic basket with a few snacks, frozen water, towels, an umbrella, a picnic mat, sunblock, flip-flops, sunglasses and my must have sun hat. Just as sunscreen is important for your body, your hair too needs protection from the harsh UV rays as it can fade out colour, frizz and dehydrate your hair. 
Love your locks by protecting it

Wear your sun hat when you are not swimming to protect your skin and your hair.

Before heading out to the beach or the poolside I suggest applying a leave in conditioner to protect your hair.

Those of you that have blonde hair should take extra precautions to prevent your natural oils from being stripped away and  your hair turning to green. If anything goes wrong play it safe and go to a salon.

Regardless of your hair type carry a little conditioner with you and rub it over your dry hair just before taking that dip into the water to form an additional layer to shield your hair from absorbing salt water or chlorine.

If your hair has gotten a brassy tone from the water apply a little baking soda to your shampoo to neutralize it.


Friday 14 February 2014

Red Lips


From ever so little I found that red lipstick was intimidating, strong and powerful .It set alive my thoughts of delicious fruits like watermelon, raspberry and strawberries. It was at the experimental phase of my life when I began testing all forms of food to get those perfect red lips. I tried my hand at formulating the finest ingredients of  koolaid, sherbet and ice lollies to stain my lips and make me the ultimate fashion guru.Needless to say, that did not work out well as my Mom would often command me to wash it off immediately. 

It was not too long after that I discovered the actual secret gadget was in my mom's glass cabinet, the place where all things pretty and shiny belong. I would wait until my Mom would leave the room, time her steps until she was in the kitchen, climb onto her draws and reach over to get this magnificent object. It was like having a magical wand in my little fingers, decorating my face with every colour that reflected any red tone.A few minutes later and I was picture perfect, ready to take on my role in the circus.

Growing up I had made it imperative to explore all options of red lipstick to find the one. I know that most people think that red lipstick is wonderful but choosing the right one for your skin tone is often a challenge and a fear. It is a daring step in the make up world and yet when selecting the right one, the feeling is energizing. It gives you the upper hand of not needing to make the boldest statements with your clothing, it leaves room for  the less is more approach by giving you the freedom to dress in neutrals and using your lips as the tool to your allure.

I have tried to break down a few simple steps to support you in setting aside those nerves and taking that plunge to making that purchase.

When it comes to applying any lipstick, eye shadow or blush understanding your skin tone is critical. You may either fall in a warm or a cool category. Try to use the picture above to give you a guideline of which skin type you fall into.Once you understand your skin tone selecting what make up will make your skin look brighter becomes an easier task. 
If  your tone is cool you may choose any red lipstick with a blue undertone. An easy way to understand this is that when you apply the lipstick on the back of your hand  it almost turns to pink. On the other hand if you have a warm undertone you would choose a lipstick that has orange notes, I find this is allot easier to spot.


On the left is a red lipstick for a cool skin tone and on the right for a warm tone. 

Top:Warm skin tone(Orange red)
Bottom: Cool skin tone(appears pink)
 For those that still need that extra assistance I found a trustworthy selection of brands that you would be most familiar with on Karlasugar.net
These are ideal colours of well known brands for warm skin tones.
 A perfect lipstick selection from well known brands for cool skin tones

Application
This is the technique that I use when applying my red lipstick and hope that it will give you the self-assurance that you need to take on this task.

Step 1.Before applying your lipstick exfoliate your lips with a soft face cloth, this should plump them up and remove all dead skin or any left over gloss or lipstick. 
Step 2. Moisturize your lips using a lip balm of your choice and apply a thin layer of foundation or concealer to give it a good base tone to work with.
Step 3.Take a lipstick brush to line just the bows of your lips 
Step 4. Line the inside of your bottom lip parallel to to bows following the curve
            Join the sides of your lips
            fill in the gaps
Step 5. Using your lipstick brush color the inside of your lip
Step 6 .Apply lipstick on the entire lip staying inside the lines
Step 7: Press facial tissue on lips and brush loose powder over to set the lipstick
Repeat if necessary until you have the intensity that you desire.

If you have any smudges use a tad bit of make up remover on a cotton bud and wipe away the smudges.

Add clear gloss to complete your look.


Thursday 13 February 2014

Bridal Hair

It is the month of love and I thought with all the romance in the air I should share some of my favorite bridal hairstyles. The choice of keeping it simple or stepping it up is totally dependent on you, your theme and your complete look. Ideally if you have a very beaded gown, you should  keep your hair do simple and vice versa. Play around with your make-up and hair to compliment each other.  Match your headgear well with your jewelry, the entire look should be in harmony with each other. You are the showpiece and should have what I call flow where each item flows smoothly to the next creating the perfect portrait. Keep in mind not to lose your natural beauty, when trying to create this perfect picture.

I love bridal hairstyles that are down, It is sweet, feminine and it draws attention to your face. It looks great with natural make up and can be done on long or short hair. It is perfect for a straight or mermaid cut gown where you are looking for a soft and sleek effect.

Artificial flower headgear can really add  value to your look, Here your hair does not need to be perfectly set, but the placement of the flowers are key to the overall look. I think it's stunning with a satin,silk or chiffon gown.

Here is a hairstyle that speaks for itself, it compliments a ball gown or an A line dress. This look needs little or no extras. Add in a little hair shimmer and you are ready to walk down that red carpet.

I love this mature and sophisticated hairstyle, It says confident and it opens up your face completely, leaving your bright smile and rosy cheeks to shine. Perfect for a vintage look or a high neckline.


It is okay to go for a little drama, it is your wedding day after all. This look will accentuate a lace or tulle gown perfectly.


Whichever look you choose... remember today is your day and you are beautiful!

Thursday 6 February 2014

Eyebrows

I have recently been to a new place to have my eyebrows done. Being  an eyebrow technician makes me the worst client to have in another salons chair, however, I was out of town and did not want to attempt doing it myself possibly pinching my skin and causing scabs a few days before a function. I asked for advise and went to the most recommended lady that threads brows. I sat down and for the first time gave someone else complete control of my brows. No mirror in my hands to guide her, letting go and trusting. I generally have a high tolerance for pain which has got me into more trouble many times than it has done me much good. I could clearly feel something was going wrong when my pain threshold was being pushed. I calmed my mind and continued to let her do her work. When she was done I looked into the mirror in complete shock, not only did I now have two complete different brow shapes,but I now had half of what was already thin brows. I was speechless and did not want to balance it out, as that would mean making them look like pencil lines which to me is a huge no no. I would have to use my knowledge of colouring in brows for the next few weeks or months to camouflage the issues.

I believe that  your eyes are the windows to the soul, when someone falls in love they look into each others eyes, when you are angry you stare someone down with your eyes, when you are happy, your eyes twinkle.It is one of the first things anyone notices about another person.So it is important to know that your eyebrows give your eyes expression and strengthen the frame of your eyes. Done well it can balance out your appearance or done wrong it will do the direct opposite.


After my incident I have decided to help you identify the three basic rules of eyebrows to create your ideal look and the correct shape avoiding the drama I had.You could use a ruler, the back of your brow make up brush or a pencil to follow the lines of your face.

  •  The eyebrow starts on a vertical line from the outside of your nose to the corner of your inside eye as displayed in the diagram number 1.
  • The highest part of the brow which is called the arch points to the outside of the iris as displayed in the diagram number 2  .
  • The brow ends from an imaginary line running from the corner of the nose to the corner of the eye.

I have put the diagram above to help you understand the lines more easily. Your line ABC is your starting point,your line at E is where your arch should be and your line F should be from the point of your nose to the end of your brow marking the end of your brow.

Look at the perfectly clean line running from B to E(the start to the arch) there are no extra hairs causing a base line or an untidy line. If you trying to get it perfect colour in your desired brow shape with eye shadow, clean up shadow or eye pencil smudges used to draw in your shape with an ear bud.Any hair that is outside this shape should be removed by threading, waxing or tweezing.


Make up is about blending and no harsh lines, that is a key when in comes to attempting anything . You never want to see lines, even when you are going for a very dramatic look, you always want softness. You want the make up to enhance your features. Ideally you should use a flat and slightly angled brush to colour and define your eyebrows
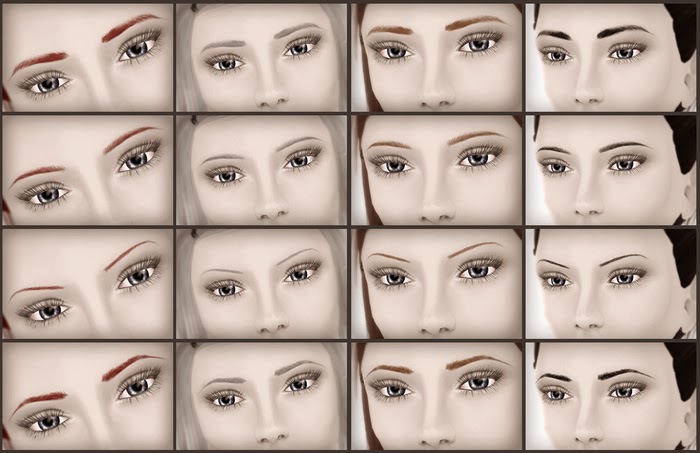
Use a matte shadow for uneven growth or an eyebrow pencil for no hair on darker skin tones.
Select the correct colour based on your hair colour(head).
use light strokes gradually building the colour to give a very polished look, if you want to keep it more natural only fill in the areas where there is gaps in the hair growth , matching the colour of your brows.

Finally set the brows with a clear mascara to keep it in perfect shape.

Monday 3 February 2014

Hair Poof

Take this look to the boardroom or a social gathering and you will project  the ultimate sophisticated image. To me this says feminine and elegant. It accentuates your cheekbones, jaw line and my most favourite feature about this look is that it creates the illusion of more height. A hair poof can be used in  up styles, half up's, straight or curly hair. The poof can be placed in the front of your head to make your forehead appear broader

in the middle to hide a very wide forehead and soften up facial features
 or to the back to give you a face lift effect without the surgery


when it comes to creating this look it really is all about the tease. you will need a comb, a strong hold hairspray and some hair pins to hold it in with. Always keep in mind to keep a small piece of hair directly in front of where you want the poof to be ,blow dried out, sleek, smooth and untouched while doing the tease, so ideally you should keep it pushed aside in a jaw clip. 

Lift the piece that you want to go up into the poof in a 90 degree angle, thereafter stroke the comb from the top of that piece to the bottom,spraying hairspray after every few strokes so that it can hold firm

 keep doing that until your hair looks like this

now all you do is simply comb the front piece that you had placed in the jaw clip or left aside softly over the teased hair.
Pin the hair around the poof down with a few hair pins until it stays into place. You may find that you want a higher poof, I suggest using the back of your tail comb to lift the hair to your preference.


Finish your look off with a pretty flower or a necklace(my little secret) to dress it up.